Christmas is coming, or that makes us believe ... We start thinking about what we are going to give, Christmas crafts to make with children, what Christmas recipes we can prepare ... and since children love to make cookies, I have thought about making a series of tutorials for you to do Christmas cookies decorated with your children.
Since the process is not simple, I will write an entry dedicated to each step we must take, the first will be to prepare the dough for the cookies, cut them and bake them. Since to decorate them we must let the cookies rest for at least two days, we have time to ask ourselves how we want decorate our christmas cookies. Today, we are going for the cookie dough recipe to decorate:
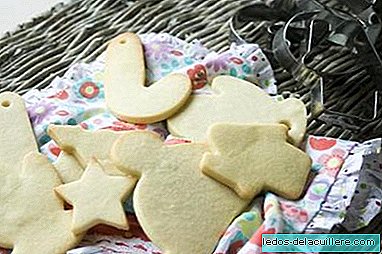
Christmas cookie recipe to decorate (with or without children)
As I told you before, there will be several ways to decorate our Christmas cookies that I will be teaching you throughout this month. The main and most important thing to have beautiful (and good) decorated cookies is the dough:Ingredients for making decorated cookies (dough)
- 225 gr of butter at room temperature (ideally, spend the night out of the fridge)
- 150 gr icing sugar (icing sugar)
- 1 egg M (preferably organic)
- 1 and 1/2 teaspoons (of the coffee ones) of vanilla extract
- 1/2 teaspoon salt
- 410 gr of flour
Necessary material
- Rod mixer / kneader / thermomix or any kitchen robot
- Oven
- Oven plate
- Baking paper (at the supermarket) or silicone mats
- Christmas cookie cutters (these I bought at Decake)
- Roller
- Wooden slats to level the dough (between 5-6 mm)
How to make cookie dough to decorate
 Following the images in the photo above, in order from left to right and from top to bottom:
- We put the butter in our kitchen robot and beat for a few seconds at medium-low speed until a paste forms. Eye, we must not go over because the butter will melt, only to form a paste.
- Add the icing sugar and beat again, just to mix, a few seconds.
- We break the egg in a bowl (we do not want shell remains in our dough) and add it to the butter mixture along with the vanilla extract and salt. We beat again at medium low speed a few seconds (it will seem that we have a kind of cut pasta, do not worry, it is normal).
- Add half the flour and mix again for a few seconds.
- We add the rest of the flour. We already have our mass.

- Sprinkle with flour our silicone mat (if we do not use baking paper) and put on it the dough (you will see that they are some sticks).
- You knead it carefully, if you see that it sticks to the mat or hands, you can put the dough in the fridge for half an hour but try to knead it with your hands as much as possible. This process is what children like best, knead knead and knead, let them stick and have fun with the dough. She, the dough, will thank you, believe me, she likes to feel loved.

- We continue kneading and end up forming a ball with our dough.

- We stretch the ball with our hands so that it is a little flat.

- We place our wooden slats (or any stop that is 5 or 6 mm) next to the dough and begin to stretch with a roller. Do not forget to sprinkle with a little flour so that the roller does not stick to you.
- If you see that you begin to stick the roller to the dough, you can put a baking paper on it and stretch again, it will be perfectly smooth.
- Put the mat or baking paper with the dough stretched out on a tray that fits in the fridge and put it in the fridge for 2 hours minimum.

- We preheat the oven to 180ºC once the stretched dough has cooled (it is very important that it is very cold), we can start cutting with our Christmas cutters. When the dough is very cold, it will easily come out of the cutters, as time goes by and warms up, it is possible that your figures begin to deform a little. Do not worry, we are making cookies with children and for them they will be beautiful and perfect.
- We put them on the baking sheet and put them on the top of the oven for about 8 minutes or until the edges begin to take color (they should not be roasted), this recipe is to have white biscuits, if you like them more crispy, you can Leave them one more minute. Keep in mind that the cooking time also varies depending on the size of the cookie, the smallest ones may need 7 minutes and the largest ones may take 10, go by taking a look at the oven so they do not pass.
Once they are ready, we take them out of the oven and let cool 3 minutes on the tray and pass them to a rack to finish cooling.
We already have our cookies ready to be decorated! Stay tuned, soon I will put more tutorials to decorate Christmas cookies with fondant, with real icing, painted with edible markers ... For now, let the cookies rest for a couple of days before decorating them.
Recipe by | Message in a Cookie
In Babies and More | Gingerbread Cookie Recipe, How to Make Easter Cookies
Live to the Palate | “Christmas star” cookies to give away, Advent cookies